
I went to Sally Beauty Supply and purchased one of their packs of nail art. It came with multiple color choices of glitter and matching colors of tiny bits of shells. I also purchased Orly's base coat + top coat polish to help finish the job. Here is a super quick guide on how I managed to create my own nail art in a time crunch!
Paint your nails any color of your choice. I chose this by Sally Hansen's Xtreme Wear:

It tried too fast for me to get to start decorating so I applied a layer of Orly as I mentioned above. I sprinkled on a thin layer of glitter on to my thumb and one finger of my choice. I personally usually prefer to just style one or two of my nails. Call me weird ha ha but its a trend I like!
Next I took the little wooden tool that came with the kit and I dipped it in my Orly bottle to get it sticky then I dipped it into the bag. Whatever shell bits that stuck to it I placed onto my nails. Once I was done I covered It with another top coat of Orly. Now, so far the nail art shell bits have did OK with staying glued on. The lady at Sally's who helped me pick everything out said that would be all I would need to keep everything glued on. If not, Ill be back for a different bonder.
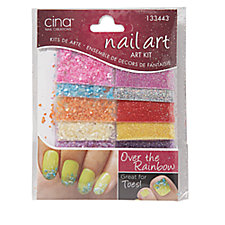
Here is a link to my exact kit:

Here is the end results! Don't mind my painted skin, ha ha I didn't clean up quite yet =) Also my nail polish remover is why my finger nail tips are white.

It looks way cute in person and was really easy to do! I did it all while on a time crunch!
love all of your beauty tips! were these expensive?! I think I will try them :)
ReplyDeleteIm pretty sure they were under 10 bucks!! I got quite a few things and my total only came to $21.
ReplyDelete